A Look at Parsl and Funcx: Two Excellent Parallel Scripting Tools for Clouds and Supercomputers
11 Jan 2021 - Dennis Gannon, School of Informatics, Computing and Engineering, Indiana University
In 2019, Yadu N Babuji, Anna Woodard, Zhuozhao Li, Daniel S. Katz, Ben Clifford, Rohan Kumar, Lukasz Lacinski, Ryan Chard, Justin Michael Joseph Wozniak, Michael Wilde and Kyle Chard published a paper in HPDC ’19 entitled Parsl: Pervasive Parallel Programming in Python. I have been looking forward to finding the time to dig into it and give it a try. The time did arrive and, as I started to dig, I discovered some of this same group, along with Tyler Skluzacek, Anna Woodard, Ben Blaiszik and Ian Foster published funcX: A Federated Function Serving Fabric for Science in HPDC ’20. In the following paragraphs we look at both and show examples of FuncX running on Kubernetes on Azure and on a tiny Nvidia Jetson Nano.
An Overview of Parsl
Parsl is best thought of as a tool for constructing and managing distributed parallel scientific workflows. For example, suppose you have to do data processing on a collection of files in a remote Kubernetes cluster at the same time manage a large simulation that will run in parallel on a supercomputer and finally channel the results to a visualization system. As sketched in the diagram in Figure 1, you want the main thread of the workflow to be managed from a python Jupyter notebook session. Parsl can do this.
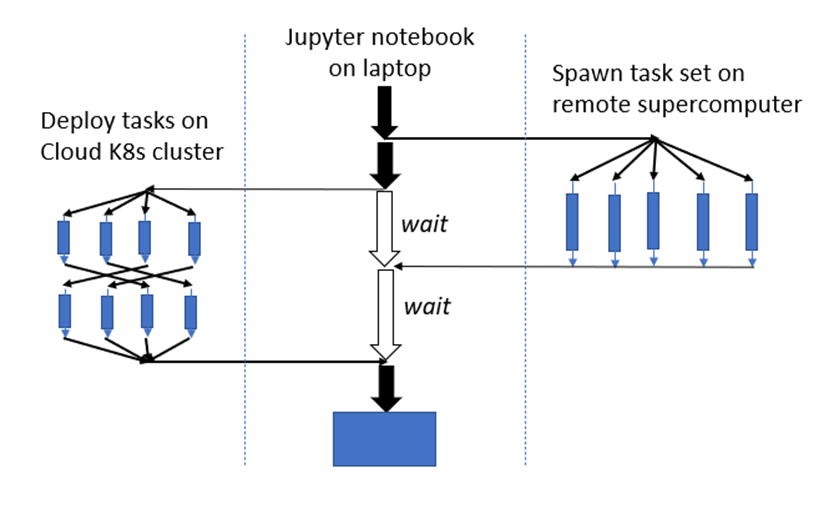
Figure 1. Hypothetical parallel distributed workflow involving remote resources managed from a Jupyter session on a laptop.
The list of actual examples of scientific applications studied using Parsl is impressive and it is documented in their case studies page. They include examples from chemistry, physics, cosmology, biology and materials science.
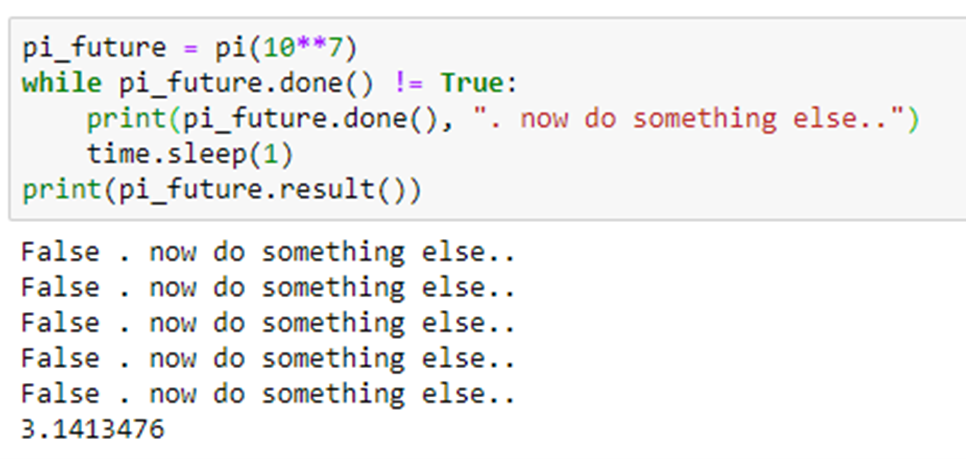
Programming Parsl is based on the concept of futures. This is an old idea in which function invocations returns immediately with an object that represents the “future value” that the function will compute. The calling thread can go about other work while the function computation takes place in another thread of execution. The calling thread can later wait for the function to complete and retrieve the result. To illustrate this here is an example of a function that computes Pi.
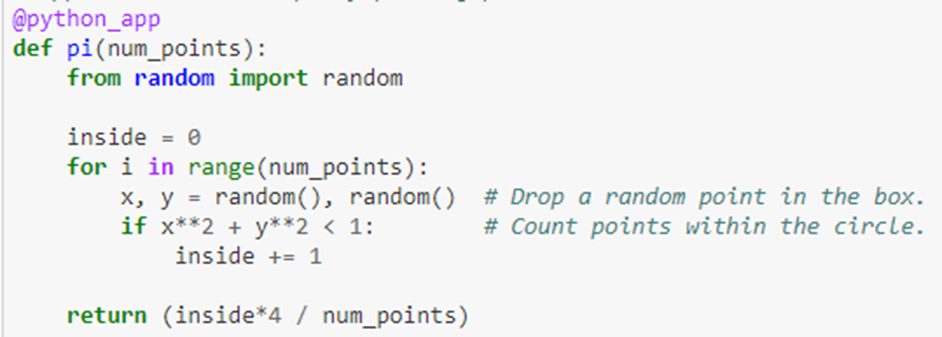
The decoration @python_app indicates that this function will return a future. We can check to see if the computation is complete by calling done() on the future object. When done() returns true we can get the result value with the result() function.
Parsl will allow functions returning futures to be composed into graphs that can be scheduled and executed in “dataflow” style. For example if we have to additional functions F(x,y) and G(a,b) that return futures then the graph in Figure 2
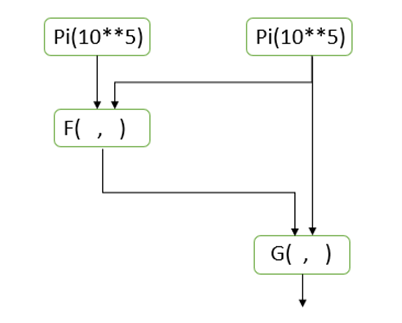
Figure 2. Parsl dataflow-style scheduling
will be scheduled and executed so that F and G are not invoked until the values of its arguments are available.
Parsl also has a data provider class that facilitates access to remote files. Parsl has a way to handle futures for file objects called dataFutures which is a mechanism to guarantee synchronization around file reads and writes from remote threads.
The true strength of Parsl is in how it separates the execution and runtime from the high-level language Python script. Parsl is unique among parallel programming systems in that it allows a Parsl program to run and SCALE across laptops, shared memory multicore servers, small HPC Clusters, Kubernetes in the cloud, and supercomputers. It accomplishes this by allowing to programmer to specify an Executor class to manage concurrency in the running of the application. There are currently four executors: ThreadPool, HighTroughPut, WorkQueue, and ExtremeScale. Each executor must have a Provider that provides the mechanism to connect to the local resource for launching tasks. There is a simple LocalProvider for shared memory multiprocessors and a provider for Kubernetes in the cloud. In addition, there are special providers for a host of supercomputers including
- Argonne’s Theta and Cooley
- ORNL’s Summit
- Open Science Grid Condor Clusters
- University of Chicago Midway Cluster
- TACC’s Frontera
- NERSC’s Cori
- SDSC’s Comet
- NCSA’s Blue Waters
- NSCC’s Aspire 1
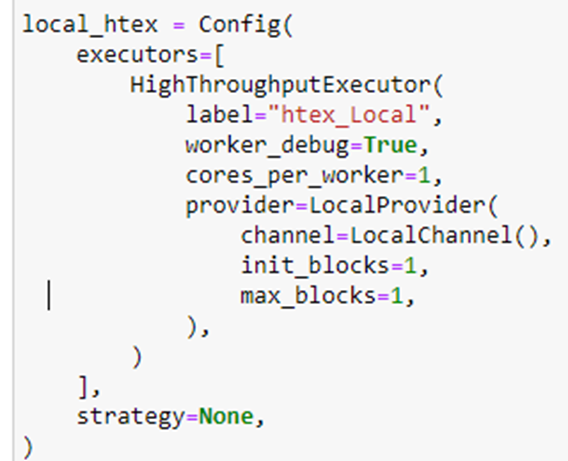
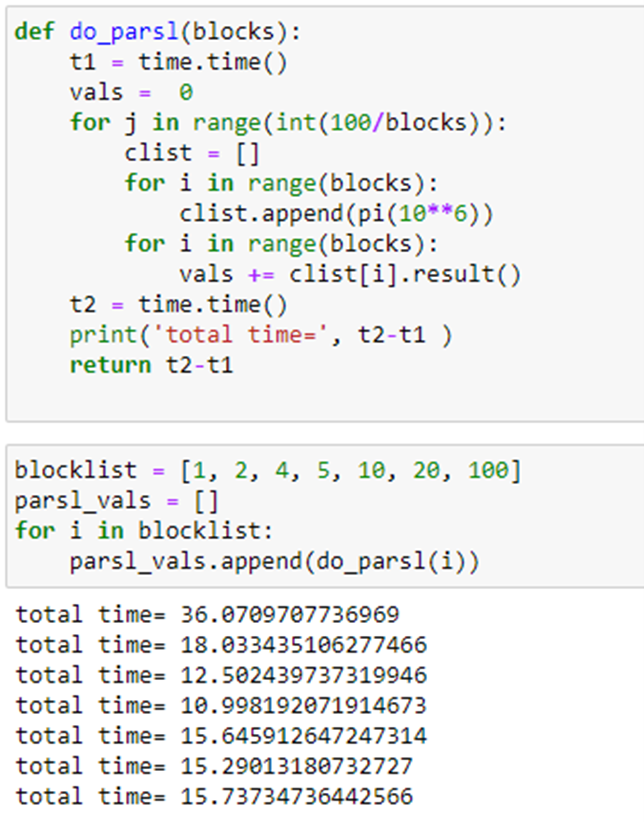
To illustrate executors, we have allocated an ubuntu “data science” vm on Azure that is an 8 core (4 real cores) server. We will run 100 instances of the pi program from above, but we will do this we different levels of concurrency. We would like to do this with maximum throughput so we will use the “HighThroughputExecutor” configured as

We will first run pi(10**6) sequentially 100 times. Next, we launch two instances of pi repeated 50 times. Doing 4 instances concurrently for 25 repetitions is next. Repeating this process for 5, 10 and 100 concurrent instances gives us the following.
Compared to Dask
In many ways Parsl is like Python Dask (which we wrote about in a 2018 blog article.)
Dask is heavily integrated into the python stack. Numpy and Pandas smoothly interoperate with Dask.
For the embarrassingly parallel bag-of-tasks applications Dask has a feature called dask.bag (db below).
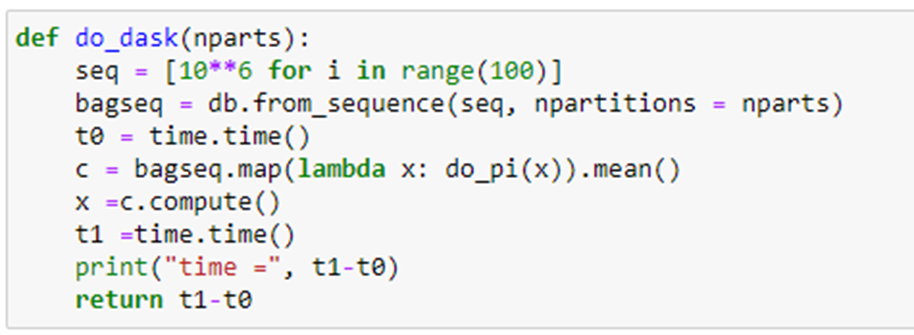
We can compare Dask on the same 8 core Azure ubuntu machine that we used above. We create a list of 100
copies of the value 10**6 and create a bag sequence from this. We partition this bag into “nparts”
partitions and invoke it in parallel as follows.
Running this with the same set of partitions as above we get the following.
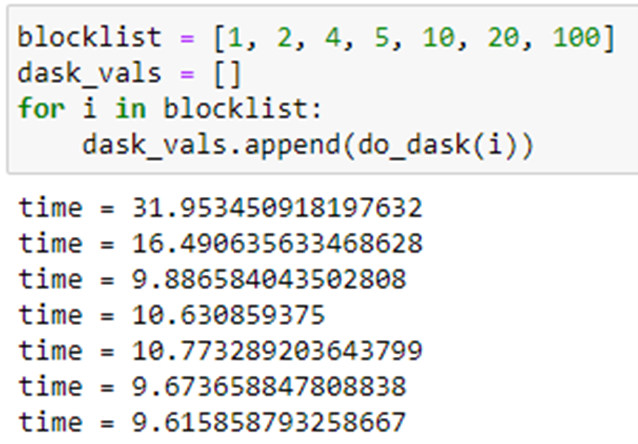
Note that the best performance is achieved when there is one execution of pi(10*6) per partition. The graph below illustrates the relative performance of Parsl and Dask.
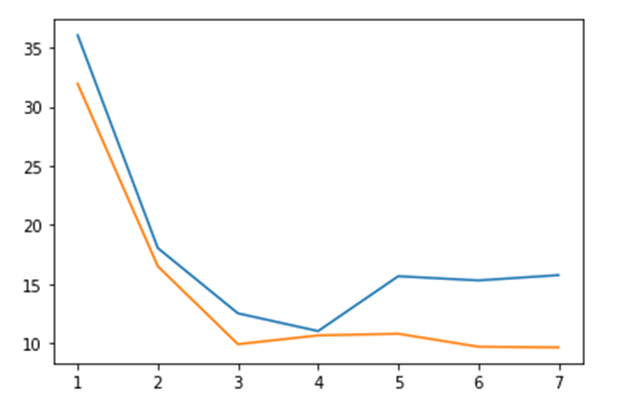
Figure 3. Dask (orange) vs Parsl (blue) execution time for block sizes 1, 2, 4, 5, 10, 20, 100.
Without further tuning of the executor and provider for running Parsl on your multicore laptop I believe Dask is the best performer there. (The Jupyter notebook that contains these tests is in the repo dbgannon/parsl-funcx (github.com).) But this is certainly not the whole story. You can use your laptop to debug a Parsl script and then run it with a different executor on a massive cluster or supercomputer to achieve remarkable results. In the Parsl HPDC ’19 paper, the authors provide ample evidence that Parsl outperforms every other alternative except perhaps a custom MPI program.
FuncX – a function as a service fabric.
Serverless computing is one of the standards computing paradigms that cloud computing supports. The AWS Lambda service was the first to introduce the idea of providing a way to have your function deployed and invoked without requiring you to deploy VMs or other infrastructure. In addition to Lambda, Azure has a serverless offering called Azure functions and Google has Cloud Functions and IBM supports Apache OpenWhisk. One of the major shortcomings of these serverless FaaS products is that they are designed to support relatively light weight computations (small memory requirement and short-lived execution).
FuncX is a FaaS fabric that is designed for science. Technically FuncX is not a serverless platform. FuncX requires that the user acquire or deploy the physical resources needed. To submit a function to the resource you need an instance of the FuncX client and an endpoint string which is the key to the host resource. To create an instance of the FuncX client and bind a function to it, you simply do the following.
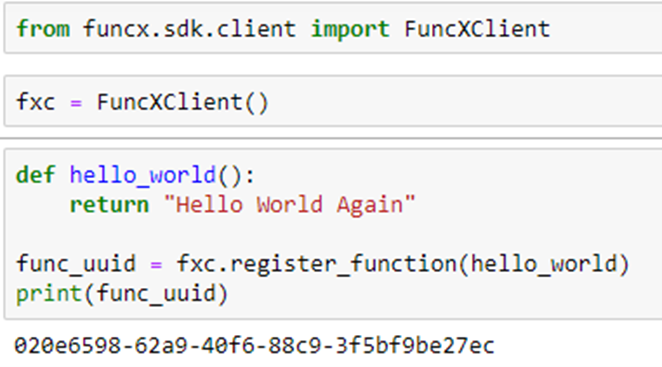
Once we have registered the function with the FuncX client and when we have the FuncX endpoint we can run the function.

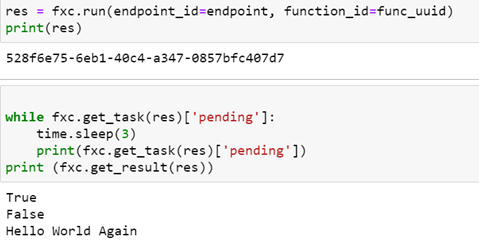
As shown above the run method returns a uuid for the result which can be passed to the client object to obtain the execution status and eventually the result. What is not obvious from this example is where the host endpoint comes from and how does the client convey the task to the host for execution.
The FuncX paper describes the architecture in detail, so we will not dwell on it here. In simple terms, requests from the client (fxc above) to run a function are sent to an AWS-based web service which puts the request into a task queue in Redis for the specified endpoint. A “forwarder process” in AWS monitors the redis queue then sends the request to the remote endpoint agent (the funcx-endpoint process running on the endpoint host). The endpoint process, called the funcx-manager distributes tasks to processes called funcx-workers that carries out the execution and returns the result. The fact that this is all managed through a cloud-based web service is very impressive. It is very fast and reliable.
FuncX on Nvidia Jetson Nano
The Nvidia Jetson Nano is a tiny, but powerful computer for embedded applications and AI. It has a Quad-core ARM Cortex-A57 MPCore processor, 128 NVIDIA CUDA® cores and 4 GB memory. Installing a FuncX end point on the Nano is easy. Just follow the steps in the docs. At the end of the installation, you will have the endpoint uuid. An important application of FuncX is to use it to probe an edge device and read instruments or use special features that the device provides. Because the Nano has an Nvidia GPU (and my laptop doesn’t) why not ship computation to the nano? Here is a trivial example. KMeans clustering is a standard ML algorithm that clusters points in space into a given number of nearby sets. KMeans also involves lots of vector operations so it is suitable for execution in a GPU. We have a program kmeans.py that contains four functions:
- random_init which initializes a random partition of the points in set by giving each point a code.
- update_centers calculates the “center of gravity” of each set of points.
- Compute_codes uses the current set of center points to reclassify each point according to the new centers.
- Cluster is the main function that uses iteration to over the set of centers and codes
For FuncX we will execute Cluster remotely from our laptop. It is shown below.
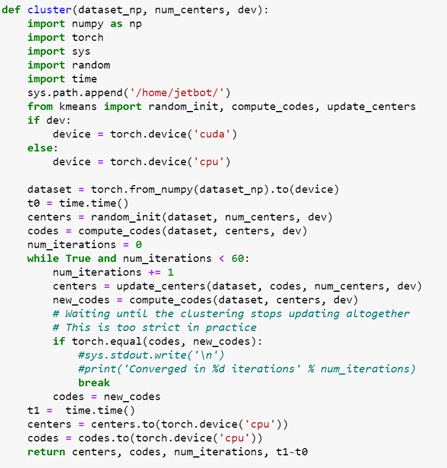
There are two important points to notice here. First is that we must import all the needed libraries inside the scope of the function because they may not be available in the worker execution environment on the remote host. Second, we note that we need to import the three additional functions from kmeans.py which is stored as the file “/home/jetbot/kmeans.py” on the remote machine. The inputs to the cluster function consist of the array of data, the number partitions and a Boolean flag which signals to use the GPU or CPU to do the computation.
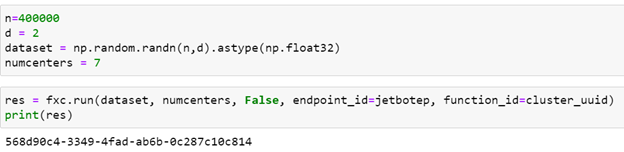
Running the function with 400000 random points in 2-d space looking for 7 partitions goes as follows.

With results shown below.
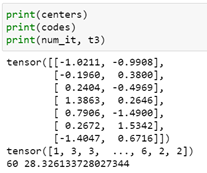
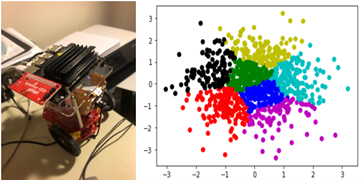
Figure 4. Jetbot device on the left and kmeans plot on the right.
Running it again with the GPU gives a similar result but the execution time is 3.6 seconds. A scatter plot of the clustering is above. The GPU yields a speed-up of 7.8 over the CPU. (This is low because the kmeans algorithms are mostly vector operations and not matrix-matrix operations. Algorithms that have that property will yield speedup in the hundreds.) A significant shortcoming of the approach taken above is that we passed the input array of points to the function. This limits the size we can handle to about 1 million single precision floats. A more appropriate solution is to pass the location of the data to the remote computer and have it fetch the data. An even better solution is to use the properties of this edge device to gather the data from its on-board instruments for processing.
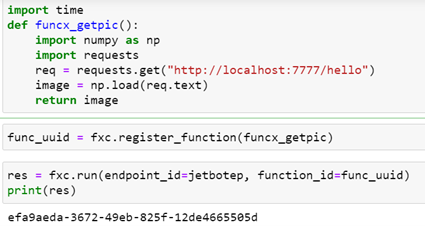
The Jenson board has a camera, so as an experiment, we decided to write a function which will capture an image from the camera and return it to display. Unfortunately, this camera requires a complex initialization and only one process can initialize and own the camera at a time. But FuncX allows multiple instances of a function to execute concurrently, so we need some way to mediate access to the camera. The solution was to create a simple miro-web service that runs continuously. It initializes the camera and has a single method “hello”. Invoking that method causes the service to grab an image and store it in a file. The path to the file is returned to the FuncX function that can grab the file and return it to the caller. In this case the function is now very simple. The camera service is waiting on a port on the local host where the function is executing. The local file is read and the image is returned.
The result is the view from the camera of part of the office where it sits.
FuncX on Kubernetes
In the examples below we will demonstrate the use of FuncX with a small Kubernetes cluster. More specifically we will deploy a deep learning (BERT-based) document classifier as a function and do some simple performance analysis. The appendix at the end of this document give the instructions for installing Kubernetes on the Docker distribution on your laptop and also on Azure. The typical application of Kubernetes involves running Docker-style containers on each node of the cluster. We are going to create a special container that contains our BERT classifier model that will be loaded as the worker. Our goal is to run as many instances of the classifier in parallel as possible.
The BERT classifier
The classifier that we are going to use as our test case is described in a previous post. The classifier takes as input a text abstract of a science paper posted on ArXiv and classifies it as being either Math, Physics, Computer Science, Biology or Finance. The classifier was trained on a subset of the document abstracts. In this case we start with a pretrained BERT model, so for classification we only have to fine-tune an extra layer.
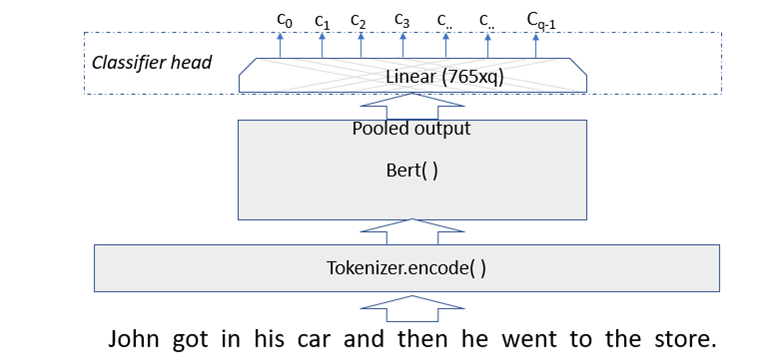
Figure 5. BERT modified with classifier layer.
Using the simpletransformers library, the training was done with two line of code:

The model is trained on a pandas dataframe of 4500 (abstract, classification) pairs. We will test it on 2600 additional abstracts.
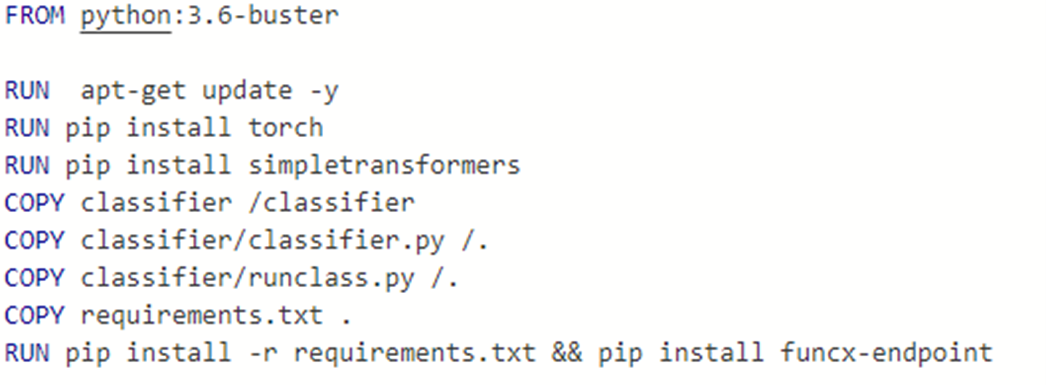
The model along with the python code that will load data and do the classification was saved in a directory “classifier”. To build the Docker container we will run on the cluster we need to start with a container with a good Python 3 implementation. Next we have to install the torch and simpletransformers library and our classifier directory are loaded and we copy the classifier.py program to the root level. Next we need to install the funcx-endpoint code. The complete Docker file is shown below.
If you want to experiment with this container it is in the Docker repo as dbgannon/classify.
The classifier.py program, has two methods for doing inference:
- classifys( list-of-abtract-texts ) which takes a list of 1 or more texts of the paper abstracts and returns a predicted classification.
- classify(list-of-abstract-IDs) with take a list of abstract IDs and returns a predicted classification and the actual classification which has been looked up by the abstract ID.
The function to send a list of abstract strings to the classifier is
If we let “s” be the string
'We show that effective theories of matter that classically violate the null energy condition cannot be
minimally coupled to Einstein gravity without being inconsistent with both string theory and black hole
thermodynamics. We argue however that they could still be either non-minimally coupled or coupled to
higher-curvature theories of gravity.'
and run this on the classifier through FuncX we get
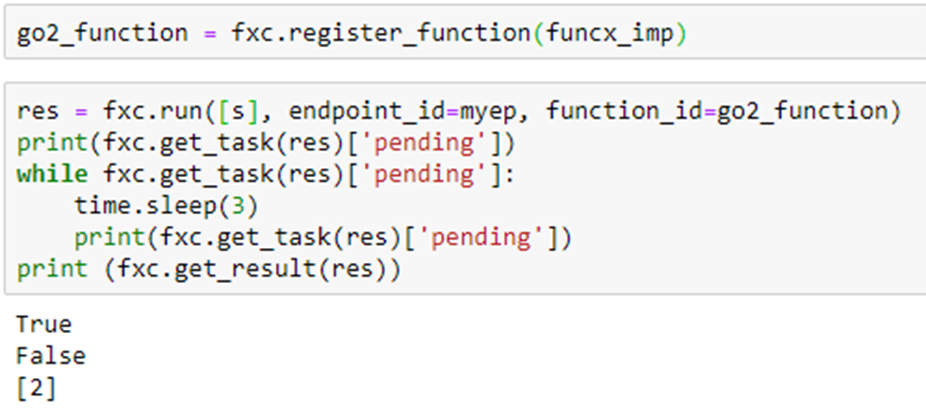
which returns 2, the correct classification (Physics). (The true and false values are results from the pending queries.) To do the performance evaluation we will use the other function which allows us to send a list of document ids. This makes us able to send longer lists (because FuncX has a limit on the size of messages). The following is an example.
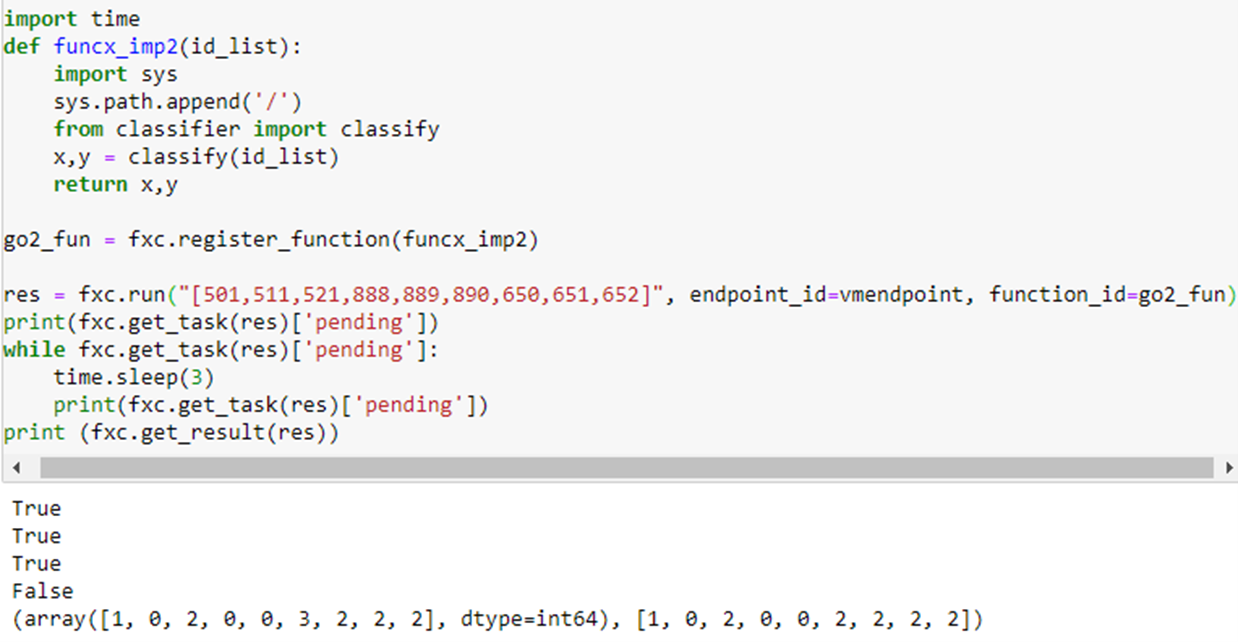
The reply gives the predicted classification and the actual classification. Notice they agree except in position 6 which corresponds to document 890:
'For a paradigmatic model of chemotaxis, we analyze the effect how a nonzero affinity driving receptors out of
equilibrium affects sensitivity. This affinity arises whenever changes in receptor activity involve ATP hydrolysis.
The sensitivity integrated over a ligand concentration range is shown to be enhanced by the affinity, providing a
measure of how much energy consumption improves sensing. With this integrated sensitivity we can establish an
intriguing analogy between sensing with nonequilibrium receptors and kinetic proofreading: the increase in integrated
sensitivity is equivalent to the decrease of the error in kinetic proofreading. The influence of the occupancy of the
receptor on the phosphorylation and dephosphorylation reaction rates is shown to be crucial for the relation between
integrated sensitivity and affinity. This influence can even lead to a regime where a nonzero affinity decreases the
integrated sensitivity, which corresponds to anti-proofreading.'
The classifier predicted 3 = Biology. The correct classification (according to the authors who submitted it to ArXiv) is 2=Physics. (I too would have gotten that one wrong.)
Now that we have our Kubernetes cluster, we can run many invocations of this function in parallel and see how it performs. The cluster we are using has only five nodes, each with 2 cores, but only one copy of the container can fit on each node. One of the beauties of FuncX is that when it gets to many requests it automatically spawn a new worker (which are called Pods in Kubernetes). Using the Kubernetes dashboard we can see what it looks like when we have the system loaded with parallel requests.
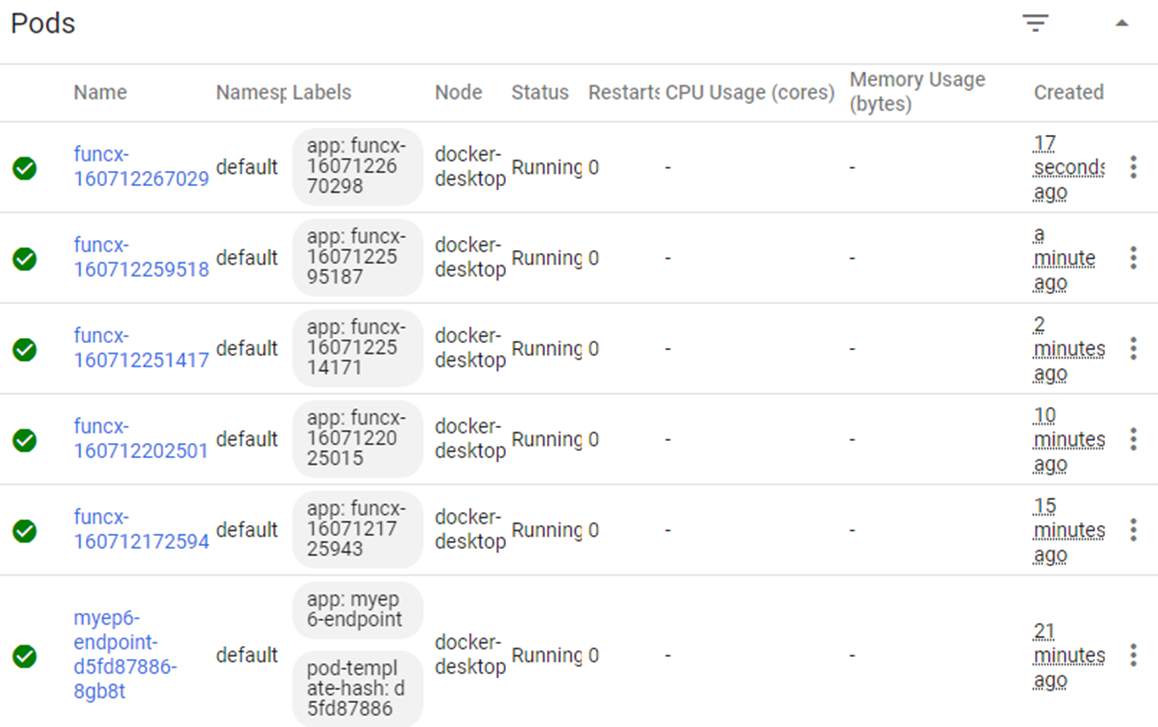
We have only 5 nodes, so each node has one copy of the classifier container running as funcx-…. One node is also running the endpoint server. We should also note that when not receiving new requests the endpoint manager starts killing off un-needed workers and the number of deployed pods drops.
A Performance Experiment.
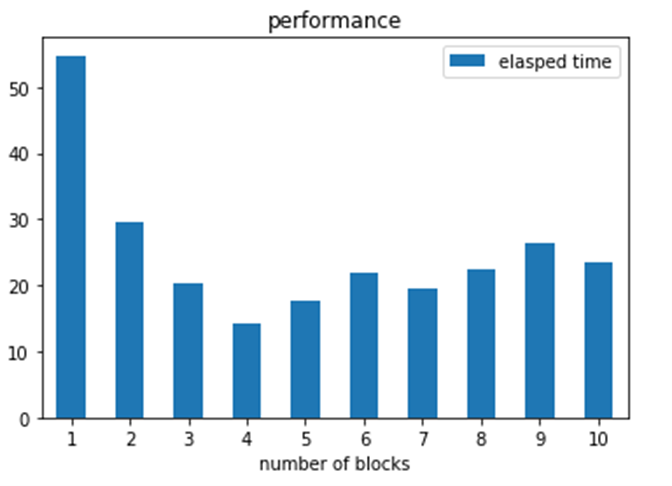
If you divide a fixed number of independent tasks between P processor in parallel the the total time to execute them should drop by a factor of P. Let’s check that with our classifier. We consider our set of tasks to be 250 document abstracts. We have created an array of document indexes called vals_string. Vals_string[ n-1] contains 250/n of the documents for n in the range 1 to 10. In the code below we launch p instances of our funcx_impl2 each working on vals_sting[ p – 1]. Then we wait for them all to finish. We do this with p in the range of 1 to 10.
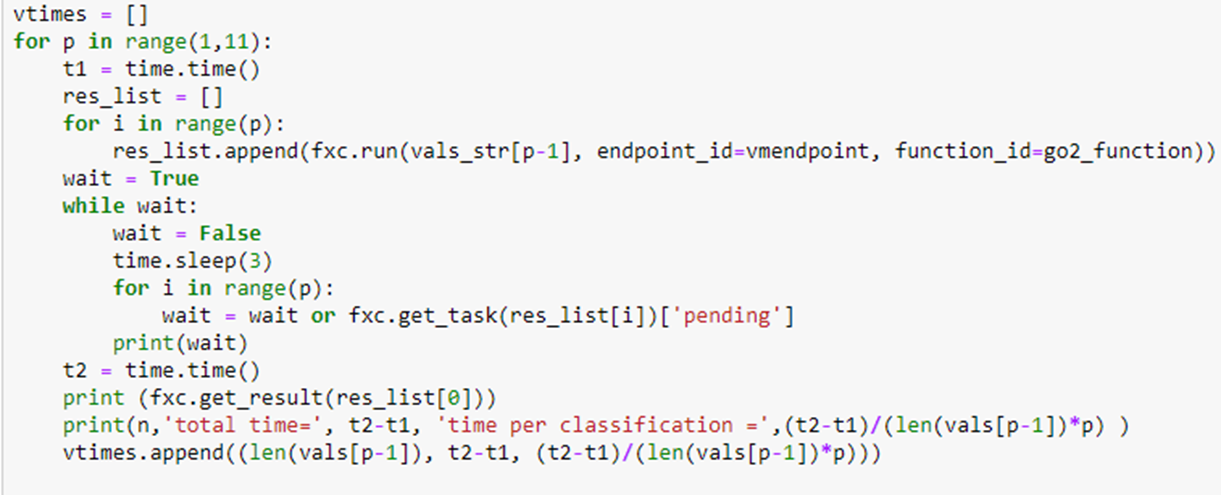
in the first case one pod computes the entire set of 250 docs in 54 seconds. Next two pods working in parallel complete the task in 29 seconds. The optimal case occurs when 4 pods work in parallel on the 4 blocks. After that, the 5 pods suffer scheduling delays trying to execute more tasks than 4. Recall that we only had 1 cpu per pod. While 5 pods are available, the endpoint is also running on one of them.
A second question is to look at the average time per inference achieved. In each case we are asking the classifier to classify a set of documents. Each classification requires a BERT inference, so what is the inference rate?
Another factor is that every execution of the classify function must load the model. If the model load time is C and the rate of each classify operation is r, then for N classification the total time is
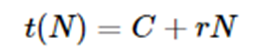
So the average for time for all N is

Hence for large N, C/N is small and the inference rate is r. If the load is divided among p processors in parallel, then the time is
So the average to evaluate all N items is now

Looking at the actual measured inference time from the experiments above we see the average time per inference in the graph below.
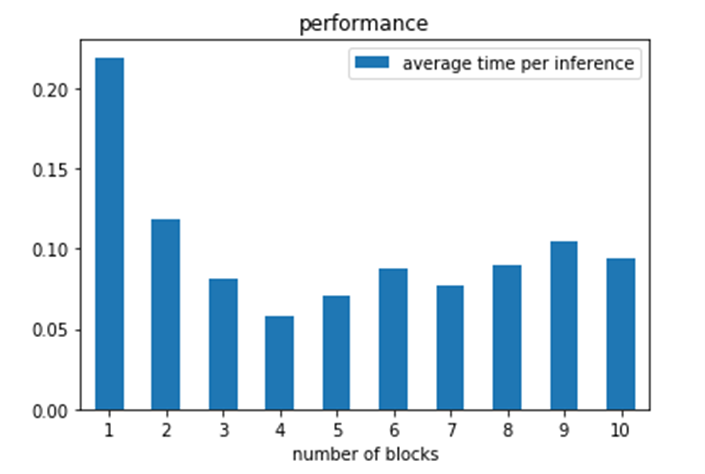
In a separate experiment we measured the load time C to be about 3 seconds. Looking at the first item in the graph above we see that r is close to 0.2 for a single thread. Using the formula above we can plot an approximate expected values (where we add a small scheduling penalty for tasks counts greater than our number of available servers as
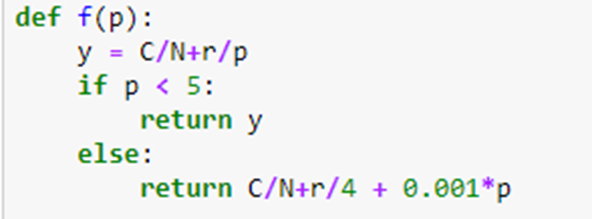
The added scheduling penalty is just a guess. By plotting this we get a graph that looks similar to the data.
Final Observations
Parsl and FuncX are excellent contributions to computational science. The only parallel computing paradigm that they don’t explicitly cover is distributed parallel streams such as AWS Kinesis or apache Storm or Kafka. On the other hand, we experimented with using FuncX to launch functions which communicated with other functions using message brokers like AWS simple queue service and Azure storage queues as well as ZeroMQ. For example, you can use FuncX to launch a function that connects to an instrument and establishes a stream of values that can be pumped to a queue or remote file system. We didn’t include those examples here, because this is already too long. However, we were convinced we could emulate the capability of Kafka and Storm stream parallelism with FuncX. In fact, it seems FuncX uses ZeroMQ internally for some of its function.
I want to thank Ryan Chard, Zhuozhao Li and Ben Galewsky for guiding me through some rough spots in my understanding of FuncX deployment. In the following appendix I have documented the steps I leaned while deploying FuncX on Azure and Docker. All of the code described here will be in the repo dbgannon/parsl-funcx (github.com).
In summary, FuncX is Fun!
Appendix: Getting Kubernetes up on Windows, Mac and Azure
If you are running the latest Windows10 or MacOS you can install docker and with it, Kubernetes. The latest version on Windows10 will use the Linux subsystem as part of the installation and with that, you get a version of Kubernetes already installed. If you go to the docker desktop control (click on the docker icon and in the control setting you will see the Kubernetes control. You will see an “enable Kubernetes” button. Startup Kubernetes.
You will also need Helm. (To install helm on Windows you need to install chocolatey .) Helm is a package manager for Kubernetes that is used by Funcx. In a shell run
choco install kubernetes-helm
On the mac you can install helm with
$brew install kubernetes-helm
Followed by
$ helm init
A good way to see what is going on inside a Kubernetes cluster is to run the Kubernetes dashboard. First you must start a proxy server on Kubernetes with
> kubectl proxy
Starting to serve on 127.0.0.1:8001
In another shell run
kubectl apply -f https://raw.githubusercontent.com/kubernetes/dashboard/v2.0.4/aio/deploy/recommended.yaml
To access the dashboard you will need a special token. To get that run
kubectl -n kubernetes-dashboard describe secret $(kubectl -n kubernetes-dashboard get secret | grep admin-user | awk '{print $1}')
On windows, the “grep” won’t work but token is displayed anyway as part of the output.
Go to the link on localhost: 8001 given by this Kubernetes Dashboard and plug in the token. You will see the important categories of services, pods and deployments.
Now we are ready for Funcx! Go to https://github.com/funcx-faas/funcX and download the file. Store that in some place like your home directory C:\Users/You or /home/you. (I am indebted to Ryan Chard and Ben Galewsky for walking me though the next few steps!!)
First you will need a .funcx with a credentials subdirectory which contains funcx_sdk_tokens.json. To get this do
>pip install funcx_endpoint
>funcx-endpoint configure
You will be asked to authenticate with Globus Auth. From the funcx.org website:
We require authentication in order to associate endpoints with users and enforce authentication and access control on the
endpoint. As part of this step we request access to your identity information (to retrieve your email address) and Globus
Groups management. We use Groups information to facilitate sharing of functions and endpoints by checking the Group
membership of a group associated with a function.
Once you have completed that, cd to the credentials directory and execute
>kubectl create secret generic funcx-sdk-tokens --from-file=funcx_sdk_tokens.json
and then pick a name for your endpoint and do
>helm repo add funcx http://funcx.org/funcx-helm-charts/
And then
>helm install yourEndPointname ./funcx-dev/helm/funcx_endpoint
if you do
>kubectl get pods
you will see yourEndPoint. Given its pod ID you can do
>kubectl get logs YourEndPointPodID
You will find the endpoint uuid in the logs. Alternatively, you can go to the logs directly on the Kubernetes dashboard. You are now ready. You can try the example above to test it out.
To deploy a special container as the worker, such as the container created for the BERT classifier described above you need a special yaml file. In that case the file is shown below.
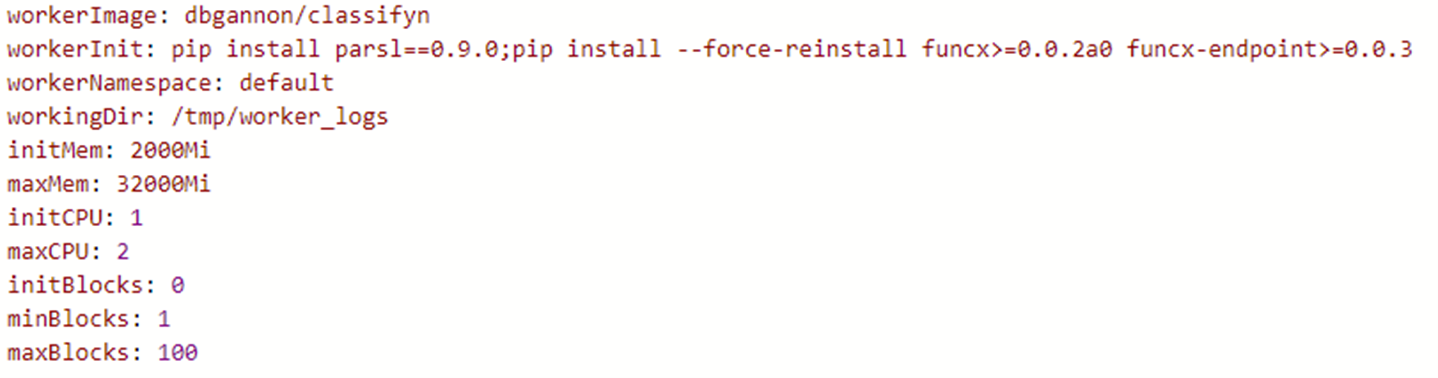
Let’s call it Myvalues.yaml. The final helm deployment step is the command
>helm install -f Myvalues.yaml myep4 funcx-dev/helm/funcx_endpoint
You can now grab the endpoint uuid as described above and invoke functions that use the environment contained in the container.
Kubernetes on Azure
If you want to install it on an Azure Kubernetes cluster, you need to first create resource group and a container registry and an azure account. To deploy the cluster, it is best to do this from the command line interface. You can get the instructions for that here. To manage the azure container registry, go to here. Suppose the container registry called “myContainers” and the resource group is called “parl_test”. To create the cluster named “funcx-cluster” in the Azure region “northcentralus” do the following.
>az aks create -g parl_test -n funcx-cluster --location northcentralus --attach-acr funcx --generate-ssh-keys --node-count 5 -node-vm-size Standard_D2s_v3
You can monitor the creation status on the portal. Next the following steps get your endpoint set up for the cluster
 >az aks get-credentials --resource-group parl_test --name funcx-cluster
 >cd .\.funcx\credentials\
 >kubectl create secret generic funcx-sdk-tokens --from-file=funcx_sdk_tokens.json
 >helm repo add funcx http://funcx.org/funcx-helm-charts/
 >cd ..
 >cd ..
 >helm install -f Myvalues.yaml myep4 funcx-dev/helm/funcx_endpoint
 >kubectl get pods

Look for the name of the endpoint pod called myep4-endpoint- followed by long key.
Grab it and do

 >kubectl logs myep4-endpoint-6f54d9549-6hkmj
At this point you may have two clusters: one for the docker k8 cluster and one for Azure.
>kubectl config get-clusters
NAME
funcx-cluster
docker-desktop
Use “kubectl config current-context” to see which is currently responding to kubectl commands and use “kubectl config set-context” to change it. When you are done you should delete the deployment for your endpoint. It will persist as long as your cluster does and automatically restart after crashes.